How to Create Dynamic 3D Content for Corner LED Video Walls: An Expert Guide for Immersive Visual Experiences
How to Create Dynamic 3D Content for Corner LED Video Walls: An Expert Guide for Immersive Visual Experiences
This comprehensive guide is designed for professionals – content creators, system integrators, marketers, and architects – seeking to harness the full potential of these spectacular displays. We will delve deep into the intricacies of planning, creating, and deploying 3D content that transcends conventional flat-screen limitations, bringing spaces to life with stunning visual depth and dynamic storytelling.
Understanding the Corner LED Canvas: More Than Just Two Walls
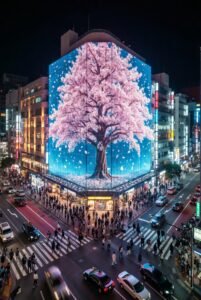
Before diving into content creation, it’s crucial to understand the unique characteristics of a corner LED video wall. Unlike two separate flat screens meeting at a right angle, a true corner LED wall utilizes specially designed seamless modules that wrap around the corner, creating an unbroken visual surface. This eliminates the unsightly bezel line, allowing for a continuous, flowing image that can produce powerful 3D illusions and an enhanced sense of depth and volume.
Key Characteristics:
- Seamless Transition: The critical feature is the absence of a visible seam or gap at the 90-degree bend, which is vital for creating believable 3D effects.
- Dynamic Perspective: Viewers approaching the corner perceive the content from varying angles, making the illusion of depth more potent than on a flat screen.
- Expanded Canvas: The corner essentially offers a wider field of view, drawing the audience deeper into the visual narrative.
- Architectural Integration: Often recessed or built into structures, these displays become an integral part of the environment, not just an add-on.
For our 3D LED Display product line, the seamless nature and superior pixel pitch are specifically engineered to maximize the impact of stereoscopic and anaglyph-free 3D illusions, making the content creation process even more critical.
The Core Challenge: Distorted Reality vs. Immersive Illusion
The primary hurdle in creating 3D content for corner LED video walls lies in compensating for the physical bend. Standard 3D content, designed for a flat projection plane, will appear distorted and stretched when mapped directly onto a corner. The goal is to create content that, when viewed from the intended audience’s perspective, appears geometrically correct and projects a convincing illusion of depth or protruding objects.
This requires a specialized content creation pipeline that accounts for the display’s geometry and the viewer’s anticipated position. It’s not merely about rendering a 3D object; it’s about rendering it *through a virtual lens* that mimics the physical distortion of the corner wall, effectively “un-distorting” the image so it looks correct to the human eye.
Phase 1: Pre-Production – The Foundation of Success
Meticulous planning is paramount for successful 3D content creation for corner LED video walls.
1. Understanding the Client Brief & Objectives:
- Purpose: What is the content intended to achieve? (e.g., brand awareness, product launch, architectural enhancement, art installation).
- Audience: Who is the target viewer? What is their expected engagement level?
- Message & Tone: What story needs to be told?
- Call to Action: If applicable, what should the audience do after viewing?
2. Technical Specifications & Site Survey:
This is the most critical step for technical content creators:
- Exact Dimensions: Obtain precise measurements of the entire corner wall (width of each segment, height).
- Pixel Pitch: The distance between the centers of two adjacent pixels. This dictates the resolution and viewing distance.
- Total Resolution: Calculate the exact pixel dimensions of the entire LED canvas. For example, two 1920×1080 panels on a corner might combine into a canvas of 3840×1080, but the rendering approach needs to consider the bend.
- Viewing Angle & Distance: Where will the majority of the audience be standing? This influences the camera perspective in your 3D software.
- Ambient Lighting: Brightness requirements for content.
- Data Input & Playback System: Identify the media server or playback controller that will drive the wall (e.g., Novastar, Linsn, Brompton, Disguise, Resolume). Each has unique mapping capabilities.
3. Concept Development & Storyboarding:
Visualize how the 3D content will interact with the corner. Sketch ideas, create animatics, and plan camera movements that leverage the unique geometry rather than fight against it. Consider how objects will appear to ‘wrap’ around the corner or ’emerge’ from it.
4. Virtual Model of the LED Wall:
In your chosen 3D software, accurately model the physical dimensions and exact corner angle of the LED wall. This virtual representation will serve as your content canvas and guide your camera setup.
Phase 2: Content Creation Workflow – Bringing the Illusion to Life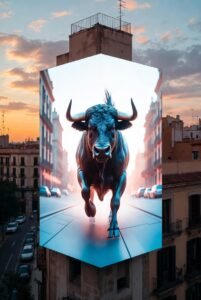
The actual creation of 3D content for corner LED video walls involves a specialized process within your preferred 3D software.
1. 3D Modeling & Scene Layout:
- Environment Setup: Create your 3D scene around the virtual model of the LED wall. This virtual wall defines the “screen space” for your content.
- Object Placement: Position 3D objects (characters, products, abstract forms) in a way that maximizes the illusion of depth when viewed from the target audience’s perspective. Think about objects appearing to ‘extrude’ from the corner or ‘recede’ into it.
- Perspective Correction: This is the most crucial step. Instead of rendering a flat image, you’re creating content that *appears* flat or geometrically correct only when displayed on the curved surface and viewed from a specific vantage point. This often involves setting up a camera within your 3D software that renders the scene with a specific lens distortion or projection mapping technique that counteracts the physical bend of the LED wall. Some advanced media servers can handle this warping, but pre-rendering with the correct perspective is often preferred for optimal quality.
2. Animation & Dynamics:
- Fluid Movement: Animate objects and camera paths that seamlessly flow across the corner, enhancing the continuous nature of the display.
- Particle Effects & Simulations: Leverage dynamic effects like smoke, water, or glowing particles that can beautifully interact with the corner geometry, creating a sense of volume.
- Kinetic Typography: Text can be animated to wrap, bend, and morph around the corner, adding another layer of depth.
3. Texturing & Lighting:
- High-Resolution Textures: Given the large scale of LED walls, use textures with very high resolutions to maintain clarity and detail.
- Realistic Lighting: Implement lighting schemes that mimic real-world conditions or create dramatic effects, enhancing the 3D perception. Consider how light and shadow will fall across the corner to emphasize depth.
- Material Properties: Utilize physically-based rendering (PBR) materials to simulate reflections, refractions, and diffuse properties, making objects more believable.
Phase 3: Software & Tools for 3D LED Content
A combination of powerful software is typically employed:
3D Modeling & Animation Software:
- Blender (Open Source): Extremely versatile for modeling, sculpting, animation, and rendering. Excellent for precise geometric control needed for corner content.
- Cinema 4D (Maxon): Renowned for its user-friendliness, Mograph module, and integration with After Effects. Ideal for motion graphics and abstract 3D content.
- Autodesk Maya/3ds Max: Industry standards for complex character animation, visual effects, and architectural visualization.
Real-time Engines (for Interactive or Dynamic Content):
- Unity Engine: Great for interactive installations, data visualization, and game-like experiences where content responds dynamically.
- Unreal Engine: Offers cutting-edge rendering capabilities, photorealism, and advanced interactive features, perfect for high-fidelity real-time content.
Compositing & Post-Production Software:
- Adobe After Effects: Essential for compositing, color correction, adding 2D elements, and refining animations.
- Adobe Premiere Pro / DaVinci Resolve: For final editing, color grading, and syncing with audio.
Media Servers & Playback Systems:
These systems are critical for mapping the rendered content accurately onto the specific geometry of the LED wall.
- Disguise (formerly D3): High-end, powerful system for complex projection mapping and LED mapping, offering advanced 3D pre-visualization and real-time content manipulation.
- Resolume Arena: Popular for live events, VJing, and interactive installations, offering flexible mapping and content blending.
- Dataton WATCHOUT: Known for multi-display show control and robust warping capabilities.
- Novastar / Linsn / Brompton Processors: These are the hardware controllers that manage the pixel data for the LED panels. They interface with the media server to ensure the content is displayed correctly.
Phase 4: Rendering & Export – The Final Output
Once the 3D content is created and animated, it needs to be rendered and exported in a format suitable for the LED display system.
- Full Canvas Resolution: Render your content to the exact pixel dimensions of the entire corner LED wall as a single, ultra-wide video file. Do not render two separate files for each panel unless specifically instructed by the media server setup.
- Codec Selection: Choose a high-quality, efficient codec like H.264, H.265 (HEVC), Apple ProRes, or Grass Valley HQX. ProRes 422 HQ or an uncompressed image sequence (e.g., TIFF, EXR) is often preferred for maximum fidelity, though file sizes will be larger.
- Frame Rate: Match the frame rate of the content to the refresh rate of the LED wall and the capabilities of the media server (e.g., 24fps, 25fps, 30fps, 60fps).
- Color Space: Ensure correct color space settings (e.g., Rec. 709, sRGB) throughout the pipeline to avoid color shifts.
Phase 5: Post-Production & Deployment – Calibration and Testing
Even with perfectly rendered content, the job isn’t done until it looks pristine on the physical wall.
1. Media Server Setup & Pixel Mapping:
The media server is the bridge between your content and the corner LED video wall. Its role is to take your rendered video file and map it accurately onto the physical LED panels, accounting for their specific arrangement and the corner bend. This often involves:
- Virtual Display Reconstruction: Recreating the LED wall’s exact geometry within the media server.
- Warping & Blending: Applying geometric corrections (warping) to ensure the content appears seamless and undistorted from the main viewing angle. The media server’s warping capabilities are crucial if the content wasn’t pre-distorted during rendering.
- Color Calibration: Fine-tuning color output to match the LED wall’s characteristics and ambient lighting.
2. On-Site Calibration & Testing:
- Test Patterns: Use specific test patterns (grids, color bars) to check for pixel accuracy, alignment, and color consistency across the entire wall.
- Visual Inspection: View the content from various angles, especially the primary viewing angle, to ensure the 3D illusions and perspective corrections are working as intended.
- Real-time Adjustments: Make minor adjustments to the media server’s mapping or warping settings if any distortions are visible. This iterative process is vital for perfection.
Advanced Techniques & Considerations for Corner LED Walls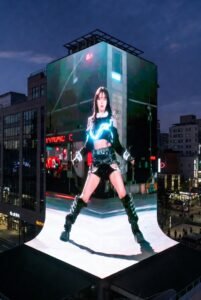
- Real-time vs. Pre-rendered Content:
- Pre-rendered: Highest visual fidelity, complex lighting, long render times, static content. Ideal for cinematic, passive viewing experiences.
- Real-time: Interactive, dynamic data integration, faster iterations, but often requires more powerful hardware and can be visually less refined than pre-rendered. Excellent for live events or installations requiring audience interaction.
- Audience Interaction: Incorporate sensors (depth cameras, motion sensors) to allow viewers to influence the 3D content in real-time, creating truly personalized and engaging experiences.
- Generative Content: Use algorithms to create ever-evolving visual patterns and designs that respond to environmental data or live inputs, adding a layer of organic dynamism.
- Audio Integration: Synchronize immersive audio with your 3D visuals to create a truly multi-sensory experience that enhances the illusion of depth and presence.
Common Pitfalls and How to Avoid Them
- Ignoring Display Geometry: The biggest mistake is treating a corner LED wall like a flat screen. Always design and render with the physical bend in mind.
- Incorrect Resolution: Using content that doesn’t precisely match the native resolution of the LED wall leads to blurry or pixelated visuals.
- Poor Viewing Angle Consideration: If the content is optimized for one specific viewing angle, it may look distorted from others. Balance the ideal perspective with acceptable viewing from secondary angles.
- Lack of Testing: Never deploy content without extensive on-site testing and calibration. Small errors visible on a monitor become glaring on a large LED wall.
- Underestimating Complexity: Creating high-quality 3D content for corner LED video walls is a specialized skill. Don’t underestimate the time, expertise, and resources required.
Our 3D LED Display Product Line: Engineered for Immersive Content
Our commitment to innovative display technology is embodied in our 3D LED Display product line. These displays are meticulously engineered with:
- Ultra-Fine Pixel Pitch: Ensuring exceptional detail and clarity, even up close, which is paramount for believable 3D illusions.
- High Refresh Rates: Minimizing motion blur and ghosting, crucial for smooth animation and dynamic content.
- Superior Color Depth & Contrast: Delivering vibrant, accurate colors and deep blacks that make 3D effects pop.
- Seamless Module Design: Specifically for corner and custom installations, guaranteeing an unbroken canvas for your creative visions.
- Robust & Reliable Performance: Built for continuous operation in various environments.
When combined with the expert content creation strategies outlined in this guide, our 3D LED Displays provide an unparalleled platform for bringing your most ambitious visual concepts to life, transforming spaces and captivating audiences.
Conclusion
Creating compelling 3D content for corner LED video walls is an intricate yet incredibly rewarding endeavor. It demands a holistic approach, blending technical precision with artistic vision. By meticulously planning, understanding the unique geometry of these displays, utilizing advanced 3D software and media servers, and rigorous testing, content creators can unlock a new dimension of visual storytelling.
The immersive potential of our 3D LED Display product line, especially in corner configurations, offers businesses and creatives an extraordinary medium to engage, inform, and inspire. As these technologies continue to evolve, the demand for specialized content creation expertise will only grow. Master these techniques, and you’ll be at the forefront of a truly transformative visual experience.
For more information on our 3D LED Display product line or to discuss your specific content creation needs for your next corner LED video wall project, please contact our experts today. Let us help you turn your vision into a breathtaking reality.
“`